Showing posts with label tutorial. Show all posts

Wednesday, May 1, 2013

Make your Own Deodorant--EASY

Antiperspirant makes me itch, but I've never found another deodorant without it that worked well, until I used a men's deodorant. However, that had toxic chemicals in it, I later found out. Boo! So, I mustered up the courage to make my own. It's SUPER EASY! Easier than making a dessert! Check it out!! Plus, a batch like mine costs you less than a dollar!

I made my husband try this, and he LOVES it too! He says it works better than any other deodorant he's ever used, and he didn't use antiperspirant either. He sweats easily and walks around constantly as a teacher, and he's pleased with the results of this deodorant.

Here's what you need:
  • 1/4 cup of baking soda 
  • 1/4 cup corn starch (not corn flour or any other corn product) 
  • 1/4 cup coconut oil  
  • A small pot
  • A spoon
Here's what you do:

1. Put each ingredient in the small pot.

2. Turn the heat on low and start stirring. It starts to melt, but it quite clumpy at first.

3. Stir until it's super smooth. Add a couple drops of an essential oil at this time, if you want. I added the Serenity mixture by Doterra.
4. Let the mixture cool down a bit, and then transfer to a container that's easy to get your fingers into.
Don't let the mixture cool too much, otherwise it won't pour into a container, but you don't want the heat from it to release chemicals from the container into it.


I've been using this for a couple weeks now, and the consistency seems to have dried up a little. It was going on clear at first, but now is a little powdery and white. I'm going to try adding a little more coconut oil to see if that helps.

Has anyone tried this? Do you have any other deodorant recipes you like or want to try? Do you make any other personal care products for yourself?

Tuesday, May 29, 2012

Scraps to Skirt

My niece recently turned two, so I made her a little skirt out of strips of cloth scraps.  I always have leftover scraps from projects, so this was a perfect way to use up some of that.  Originally I saw the idea on Pinterest.
For this project, you'll need:
-Scrap fabric
-Scissors
-1/2" or 3/4" piece of elastic that's smaller than the waist you're making it for
-Sewing machine and thread

First, you can sew the elastic in to a circle.  You should overlap it about an inch, stitching an "X" and a box on the overlapping area for extra stability.  Second, you can start tearing your strips of fabric.  I tried to make all of my strips the same width, but they're different lengths depending on the size of the scraps I had.  To tear the fabric, I simply cut a small notch in the fabric, then tore down it from there.  This can actually be a fun thing to do with older kids or a friend (my husband helped me).  You can choose to tear all your fabric at once or tear as you tie it on the elastic.

Third, start tying the strips on the elastic band.  I knotted the strips on by looping them around the elastic so the fabric would lay more flat, and it covers the band more nicely than a standard knot.  Try to keep the elastic from getting turned around while doing this, though it will stretch a bit.

I hope you enjoy this fun little project!  Little effort, but lots of fun for a little girl.

Sunday, May 20, 2012

Reusable Shopping Bags 301: Gift Them!

Reusable shopping bags can make great gifts!  Recently I saw that the Disney store is selling adorable ones with characters on them, which would be great for a children's gift.  A bag that doubles as wrapping paper and can be used for a long time afterward!

The shopping bags for groceries are great for wedding gifts.  I got two recently and filled them up with my favorite brands of kitchen essentials: flour, sugar, baking power, baking soda, olive oil, etc.  I included a note with the gift explaining why I think using reusable shopping bags is important and why I chose fair trade items for the shopping bags.  The couple really appreciated it and received a little education on grocery shopping.

This same idea could apply for a baby shower gift too.  What mom doesn't want another bag??  Fill up an already cute bag or add pockets to one.  Check out my friend ferferfly's blog for a tutorial on "cutifying" reusable shopping bags.

If you like what you see, leave a comment, like it, share it, email me.  I'm eager to hear from you!

Tuesday, April 17, 2012

A break and a link

Last week my husband and I took a vacation to Zion and Bryce National Parks.  It was magnificent!  This obviously didn't leave me time to write a post last week, but I intend to post about reusable shopping bags at the end of this week. 

My first post was on various types of reusable sandwich/snack bags, so for now, check out this tutorial for making your own sandwich/snack bags on Cotton Bottom Mama's blog.  She doesn't use any sort of lining for her bags, but you certainly could, keeping in mind that your food will be rubbing against this lining.  In fact, if you have any ideas for a good lining material, send them my way because I'd love to make these bags but would prefer a lining.

Happy crafting, reusing, and recycling!  Oh, this week is also Real Diaper Week over at the Real Diaper Association website (see my button).  There will be lots of new information going up on their site and giveaways all over!

Thursday, March 29, 2012

Reusbale "Swiffer" Dusters

Tired of buying those Swiffer Dusters?  Man, they're expensive!  A box of ten refills, which includes a new handle and some dusting spray, runs for $9.49 at Costco.  All you need for this project is some fleece fabric, which you can get on sale or clearance usually.  Probably a half yard would do, which might cost $3.  Thus, you'll SAVE about SEVEN DOLLARS after using your reusable dusters just ten times.

I put Swiffer in quotes because these aren't really by Swiffer now, they're made by you and me!  However, they do fit the Swiffer Duster handle, or you can make them to fit any other similar duster handle.  Also, I can't take credit for this idea; I saw it on Pinterest.  If you don't have access to a sewing machine or refuse to sew, you can purchase reusable Swiffer dusters from Mitsuyo Day's Etsy shop.  I also just noticed that she sells reusable sweeper covers which could be used for your Swiffer Sweeper or similar sweeper.

If you have a sewing machine though, you can make some reusable "Swiffer" dusters, like I did.  These could also be great as part of a housewarming gift or wedding shower present, along with some other household cleaning necessities like dish soap, detergent, glass cleaner, surface cleaner, dusting spray, and bathroom cleaner.
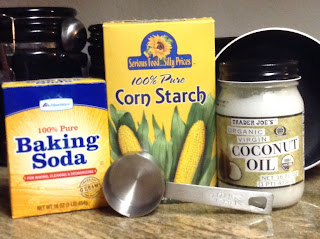
What you'll need:
21" x 9" piece of microfleece fabric for one three-layer duster or 14" x 9" for a two-layer duster
A Swiffer Duster handle
Your usual sewing needs: scissors, thread, measuring tape, marking pen or chalk (I prefer chalk)

From the edge of the fabric, measure in 2.5" and place your duster there.


Measure about 1/2" from the bottom of the fabric to the bottom of the center tab of the duster.  Make a horizontal mark at this spot.


Now, trace around the inner and outer edges of the duster--free hand or with a measuring tape is fine.


If you didn't cut a 9" high piece of fabric already: Move the duster out of the way and measure 2.5" up from the top of your trace marks.  Put a horizontal mark here.


Measure 2.5" from the side of your trace marks.  Put a vertical line here, then mark a dashed line along this spot.


Now, fold your fabric under your trace marks to the point where it meets your side trace marks and repeat (if you're layering your duster with three pieces of fabric).  When I did this the first time, I actually did four layers, which proved to be a little much for my machine.


Cut along the folded edges to make two (or three) pieces of the same size.


If you're making a three-layer duster, set aside one layer.  Leave two layers on top of each other, and pull the top layer down a half inch.


Continuing with the three-layer duster instructions: Turn over the two layers and pin the half inch of fabric you pulled down on to the back of the other layer. You may also want to create a half-inch seam on the third piece of fabric, but you don't have to.

If you're doing a two-layer duster, you may want to create a half-inch seam at the bottom anyways.  It will make the duster look nicer and maybe even last longer.  However, you will have to create SEPARATE seams on EACH piece of cloth, not layered on top of each other.


Sew the bottom seam (for each piece of fabric, if you choose), pulling the fabric as flat as you can while you sew. 


Now you should have two pieces of fabric ready to be sewn together; pin them together.  You may want to make sure your duster handle still matches the marks you made earlier on the fabric before you begin sewing.  Only sew the outer edges first.


Once you've sewn the outer edges, insert the duster completely in to the pocket you've created.  Pull the pocket back so you can see where the end of the center tab rests and mark it.  Now, sew down the middle up to the mark you just created.


Last, make cuts around the edges of the fabric in order to create the little "dusting fingers," and you can choose to round the corners at the top if you want to.  Here's the finished product:


For the most effective dusting, pull the top layers of the "dusting fingers" toward the center so that there are more exposed layers of the duster to reach those crevices and corners.


BEFORE YOU WASH, I suggest running a lint roller over the duster to pick off any large dust bunnies you picked up so those don't end up on your clothes or towels.  Otherwise, just throw in your duster with a regular load of laundry as often as you need to!